

Welcome to Week 5 of the One Room Challenge — where dreams take shape one DIY project at a time! In this week’s transformation, I took an often-overlooked corner of our unfinished basement and turned it into something warm, welcoming, and totally functional: a cozy reading nook with built-in storage. What started as an awkward, dusty alcove is now a sanctuary for quiet moments, great stories, and (let’s be honest) the occasional mid-read nap.
Here’s how you can create your own cozy reading nook without breaking the bank — all it takes is a little ingenuity, some leftover wood, and a big dash of determination.
Finding the Perfect Spot
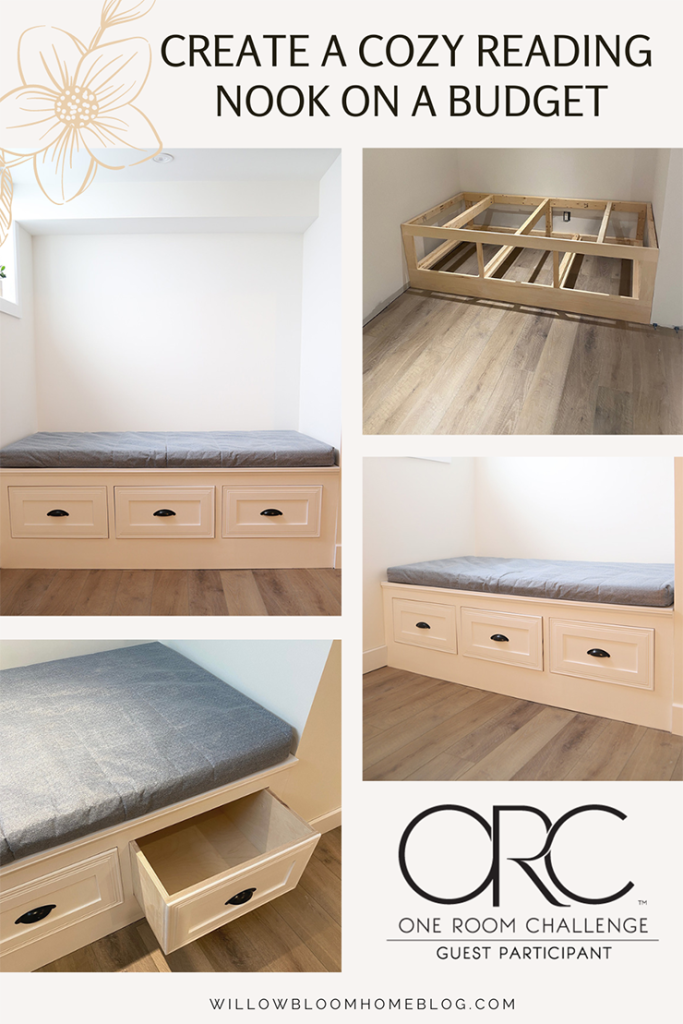
Every great nook begins with the right space — and often, that means embracing the unexpected. For me, the perfect corner was nestled next to our HRV system, a space too small for furniture and too valuable to leave unused. Measuring 76” wide and 40” deep, it mimicked the dimensions of a twin bed — and that’s when inspiration struck: why not build a twin-sized daybed into this awkward nook?
Reading nooks are best when they’re tucked away — under a window, in a closet, or between built-ins. The goal is to create a sense of privacy and warmth, like your own personal hideaway.
Design Inspiration & Budget Challenges
While I’ve always dreamed of a sunny window seat with a view, our basement doesn’t exactly lend itself to sweeping vistas. Still, the feeling of a daybed-style seat with crisp white trim was something I could achieve. I turned to Shanty to Chic’s free DIY plans for a storage daybed — a fantastic resource complete with diagrams, instructions, and a full materials list.
The pre-built options I explored were either the wrong size, too expensive, or lacked the built-in look I was after. So I went the DIY route, relying on scrap wood for the frame and purchasing only the essentials: plywood for the drawers and top, some hardware, and a few decorative finishes.
Smart Building on a Budget
Most of the wood came from remnants I had on hand. I picked up drawer hardware from Lowes and sourced high-quality Baltic Birch plywood from a local supplier. I saved even more by only priming and painting the front and top surfaces (the visible parts).
When modifying the Shanty to Chic plans, I adjusted the frame’s width to fit the space exactly (75” instead of 79”) and opted for three uniform drawers for simplicity. One key takeaway? Always use the straightest lumber you can find — it makes drawer alignment a whole lot easier!
Construction Tips & Lessons Learned
Armed with my new Kreg Jig 720, I dove into the project — assembling the frame, customizing drawer sizes, and testing each fit as I went. This jig turned out to be a worthy investment: easy to use and perfect for clean, sturdy joints.
The drawers required some finesse (read: lots of sanding and some intense chisel work) to fit perfectly. I also learned that large drawers, while visually appealing, can be heavy and costly — so if you’re working with a tighter budget or smaller space, smaller storage compartments might be the better choice.
Once the frame was in place, I added shaker-style trim, primed everything, and painted it with Benjamin Moore Chantilly Lace for a fresh, clean look.
Clever Cushion Solution
Custom foam cushions can cost a small fortune, but IKEA came to the rescue with a perfect hack: a twin foam mattress! Their Agotnes model was the ideal size and only $69 USD — far cheaper than traditional foam options. With plans to sew a removable cover and toss on some cozy pillows, it’s the perfect finishing touch for the nook.
The Final Touches
Although the base is complete, I still plan to add baseboard trim, decorative fabrics, wallpaper accents, and shelves filled with my favorite reads. The three drawers beneath the bench are massive — ideal for hiding away seasonal décor or extra throws.
This reading nook has become more than just a functional corner; it’s a little piece of peace in the midst of our busy home. And all of it came together with thoughtful planning, a touch of creativity, and a determination to work within budget.
What’s Next?
With just three weeks left in the One Room Challenge, next up is the custom desk unit, full wall shelving, and the final round of painting and decor. I’m excited to share the full reveal soon — this once-forgotten basement is well on its way to becoming the serene home office I’ve envisioned.
Thanks for following along on this journey! Stay tuned for more behind-the-scenes DIY, smart tips for saving money, and ideas to make any space — no matter how small or awkward — feel like home.
Ready to build your own cozy nook? All you need is a corner, a vision, and a little bit of elbow grease — and maybe a good book to enjoy once it’s done.
